THE UK’S MOST AWARDED PC MANUFACTURER


£100 off Gaming PCs with code: BEST23 on orders over £1,500

Mobile

THE UK’S MOST AWARDED PC MANUFACTURER

Tablet


WELCOME TO CHILLBLAST


WELCOME TO CHILLBLAST


We are a collective of amazing people striving to build impeccable PCs.


From all of us at Chillblast, we want to wish you a warm welcome to the Chillblast Community.

Here you will find a range of useful information that will guide you through your initial PC setup, plus troubleshooting tips should you run into any issues.


Let’s get started.


STEP-BY-STEP

Here's how to set up your brand new PC

We’re sure that you want to get your shiny new PC unwrapped and plugged in as soon as possible, so we’ve put together this easy to follow guide that will get you set up stress-free. 


packaging-1.jpg
STEP 1

Remove internal packaging

To keep our systems as safe as possible during transit, we offer special self-expanding foam padding when you purchase. If you selected this during the checkout process, you will need to remove this material before your system is turned on for the first time.

To do so, gently wiggle it free with even pressure, making sure not to pull too harshly in one direction as this could dislodge or damage the components inside. 


packaging-1.jpg
 
 
STEP 2

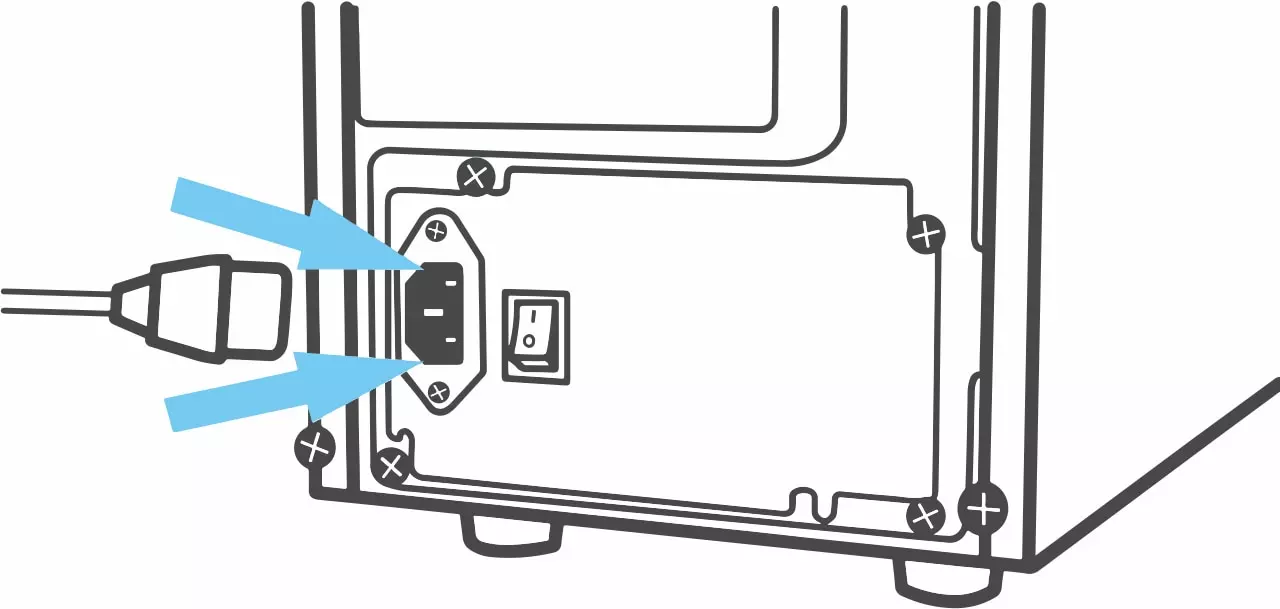
Plug in the power cable

Once the PC is free from its packaging, locate the power cable supplied and plug each end into its correct socket; one in the PC and one in the wall. Make sure that the cable is fully inserted and flush against the PC.

Next, flip the power switch located at the back of the PC into the ‘on’ position.


power-1.jpg
 
 
wifi.jpg
STEP 3 (OPTIONAL)

Connect WiFi aerials

If you ordered your computer with WiFi you will need to connect the aerials. You can find them inside the small box supplied with your PC.  If your PC has a wifi card, you will find the ports at the back of the case near the bottom. But if your motherboard comes with integrated wifi, you will find the ports nearer the top where the USB ports are located.

Once you have located the ports, simply plug in the aerials and screw them tight.

Important: Wifi is an optional extra on the majority of desktops; if you did not specifically choose this when ordering but you need to connect to a wifi network you can still use a USB wifi dongle (purchased separately).


wifi.jpg
 
 
STEP 4

Connect an ethernet cable

If your system doesn’t have a WiFi connection you can still connect to the Internet by plugging in an Ethernet Cable into the Ethernet socket located on the back of the computer, and the other end into your modem. 

(Please note that an Ethernet cable is not included with the computer.)


ethernet.jpg
 
 
monitor.jpg
STEP 5

Connect a monitor

The next stage is to connect a monitor. Locate the connection cable and plug one end into the back of the screen, and the other into the correct port at the back of your PC.

Important: If your computer has a dedicated graphics card, ensure you connect the monitor to the output on the graphics card and not the outputs on the motherboard (close to the USB ports).


monitor.jpg
 
 
STEP 6

Connect keyboard & mouse

Now it is time to connect a keyboard and mouse. To do so, plug each cable (or Bluetooth dongle if that is what they use) into a spare USB port at the back of the PC.

Tip: Most keyboards and mice are USB 1.1 or 2.0 devices so it’s best to connect these to black coloured USB ports. The blue coloured ports are USB 3.0 ports which may not always work with keyboards and mice.


Asset_10-pb5s1mn2393yeo6gsdpd0w59b8ffu5n340ievfs5n6.png
 
 
STEP 7

Turn it on

With everything you need to get started plugged in and ready to go, the final step is to turn the PC on!  Press the power button on the front of your PC and watch it come to life.
 

Any issues?


Issues

icons8-power-off-button-100-1.png

PC isn't turning on
at all...

icons8-monitor-100-1.png

PC turns on but there's nothing on screen...

icons8-wi-fi-off-100.png

PC has no internet
connection...


Our top priority is making sure you have the best possible experience with your new PC, so if the issue you are facing is not listed here, please don’t hesitate to contact us so we can provide further help. 
 

Contact Us


What happens next?

We hope you never run into any issues with your PC. However, if you do, don’t worry.

We have an excellent team of passionate customer support staff who will take your call and find a solution to fix your PC may have, no matter how small or how long it’s been since you made your purchase.

Don’t just take our word for it, here’s what some of our other customers have to say…


Customer Support FAQ

Most frequent questions and answers


Getting in contact with the sales or support team is easy. Simply go to the ‘Any Questions’ section below and you will find all the contact information you need, including the phone number and email addresses for both teams. There is also a message form located there for a quick and easy contact process if you are not a fan of talking on the phone.

If you contact the teams either through direct email or the message form in the ‘Any Questions’ section below, you can expect a response by the next working day. If you choose to phone and the lines are free, you will be spoken to straight away. However, unfortunately, we can’t always guarantee an immediate response as the team may be dealing with a higher influx of calls and emails on that day. In those scenarios, your patience and understanding are always thoroughly appreciated.

To make the support process as smooth as possible, it is always helpful to have certain bits of information ready and on hand before you get in contact. These include: images or videos that depict the damage or build issue your PC may have, and your order number so that the team can locate your purchase in the system right away. 


Your Warranty

 
How long does it last?

We provide our 5 year warranty as standard with every purchase. It consists of a 2 year collect-and-return package which includes local-rate telephone support, plus we'll collect and return your PC at no charge. The remaining 3 years include labour and phone support, but we no longer facilitate the PC collection or return.


What does it cover?

Our warranty covers an extensive range of issues, transit damage and problems that may arise both when turning your PC on for the first time, and after an extended period of use. For a full breakdown of what the warranty covers, click here.

system_1-Copy-p93eutstu9cf2beggagp46xqeosnl3yehus3u7hsaw.png

 
Is it one use only?

Your warranty is not one use only. During the entire 5 year package, you have access to unlimited repairs as we want to do everything we can to provide you with a high-performance PC that lasts. Even after the warranty period, we offer exclusive upgrades and repair services with discounted parts and subsidised collection, delivery and labour charges.

 
Additional benefits?

We believe this is one of the best warranties available from any custom PC builder in the UK. But, if you’re looking for additional peace of mind, we also offer a 3 Year Gold Collect-and-Return package as a potential add-on for desktop PCs specifically.

system_1-Copy-p93eutstu9cf2beggagp46xqeosnl3yehus3u7hsaw.png


Any questions?

If you have any further questions, feel free to get in contact with us and we will get back to you as quick as we can.

You can also find solutions on the Chillblast Helpdesk.

Phone: 0330 390 4163

Email: [email protected]

Mon-Fri 09:00 - 17:30 - Closed Bank Holidays


Subscribe to our newsletter

Receive news updates plus discounts and special offers!

Your subscription could not be saved. Please try again.
Your subscription has been successful.

Subscribe to our newsletter and stay updated.